Developer Guide for PlanNUS

|
Before reading this document, it is recommended to read through the user guide first.
1. Table of contents
- Developer Guide for PlanNUS
- 1. Table of contents
- 2. Setting up PlanNUS
- 3. Design
- 4. Implementation
- 4.1. Academic Calendar Planner: Add Module feature
- 4.2. Academic Calendar Planner: Edit Module Feature
- 4.3. Academic Calendar Planner: Remove Module Feature
- 4.4. Academic Calendar Planner: View Module Details Feature
- 4.5. CAP Calculator feature : Show current results feature
- 4.6. CAP Calculator feature : Set S/U by semester feature
- 5. Useful Links
- 6. Appendix: Requirements
- 7. Features Coming Soon (V3.0 and beyond)
- 8. Appendix: Instructions for manual testing
2. Setting up PlanNUS
The following steps assume that you already have a GitHub account set up beforehand. Once this has been done, proceed to fork this repo, and clone the fork into your computer using Sourcetree or any other Git GUI.
The IDE to be used should contain the latest version of Java as this is the main programming language for this application. Thus you are highly recommended to use Intellij IDEA.
The following are remaining steps to be taken to finish the set up:
- Make sure that the version is configured as JDK 11.
- When prompted, import the project as a Gradle project (could take minutes to complete).
- Enter commands to ensure that PlanNUS functions as expected. You may refer to the User Guide for valid commands.
3. Design
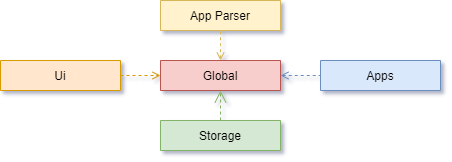
3.1. Architecture
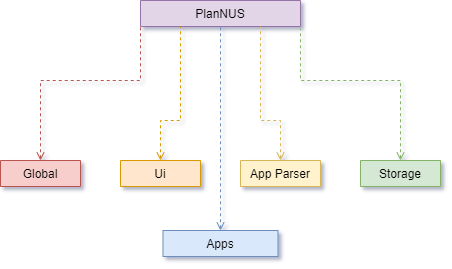
The Architecture Diagram given above explains the high-level design of PlanNUS. Below is a quick overview of each component.
3.2. Overview
3.2.1. PlanNus
PlanNus class contains the main and run method, which is responsible for the following:
-
At launch
-
Loading all modules for AY2020/21 into PlanNUS
-
Loading previous save file into PlanNUS if available
-
Unified entry point to available apps in PlanNUS
-
-
While running
- Continuously prompt user for app selection
- Save after every change in
AcadPlan
-
At shut down
- Saving of user data into save file
- Clean up methods where necessary
3.2.2. Global, Ui, Parser, Storage, Apps
- The
globalpackage contains classes, exceptions and objects that are required across the whole app. - The
uipackage contains the class which is responsible for sharing onescannerclass across the whole app to prevent multiple IO streams - The
parserpackage contains the class which handles user’s app selection - The
storagepackage handles loading and saving of user’s data to a save file. - Packages for Available apps such as Academic Planner and CAP Calculator are stored within
appspackage
3.3. Project Structure
Each package in PlanNUS as given above follows the following file structure where applicable:
- A functional class which acts as the entry point to that module
-
A parser class which parses user input into executable commands by PlanNUS
commands: A package that handles all executable commands given by parsercommons: A package with the utilities and shared classes across the parent packageexceptions: A package to handle all exceptions thrown across the parent package
The interaction within each package should ideally be as shown below.
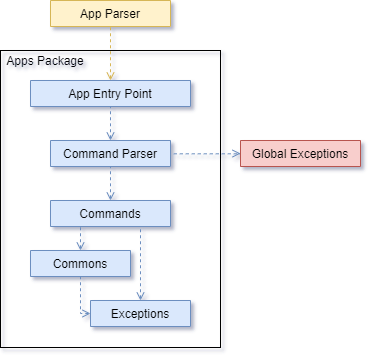
Note that while this is the ideal case, packages such as global, parser and ui might not strictly follow this structure due to these package serving a different function altogether (Refer to the sections below for more details.)
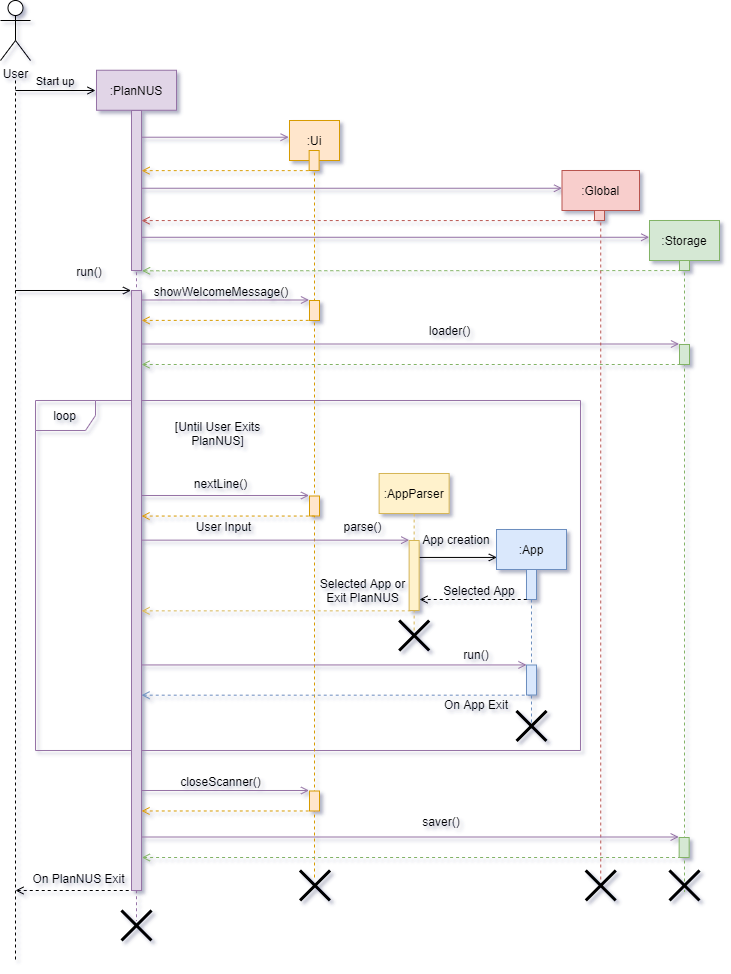
3.4. Life cycle of PlanNUS
The sequence diagram below shows how different packages and classes interact with each other throughout the whole life cycle of PlanNUS.
3.5. Details
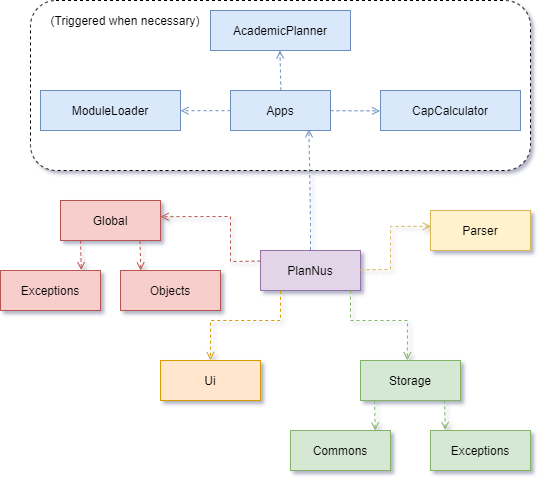
Note that the above diagram is only intended for showing the connections to PlanNus main class rather than between individual classes.
3.5.1. Global Component
Note that the diagram below only shows the connections to PlanNus class. It does not show connections between individual classes.
Classes used by multiple components are part of the global component of PlanNUS. This includes classes such as App,Command and LoggingTool. The main object classes PartialModule, FullModule and Person are also within the global component.
note that the diagram below only shows the connections to plannus main class. It does not show connections between individual classes
API : src.main.java.seedu.duke.global
3.5.2. Storage Component
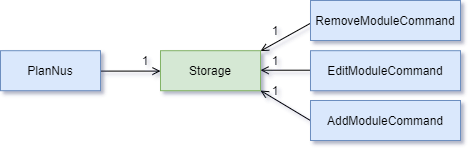
The Storage component is responsible for the loading and saving of information from text files which can happen in two types of scenarios. The first type would be through the use of commands specified in the diagram which can be found in the Academic Planner app. Alternatively, the user may also exit from the program using the commands within the application itself. This is to prevent loss of data when the user terminates the program by closing the command prompt or using the ctrl-c command.
API : src.main.java.seedu.duke.storage
3.5.3. Parser Component
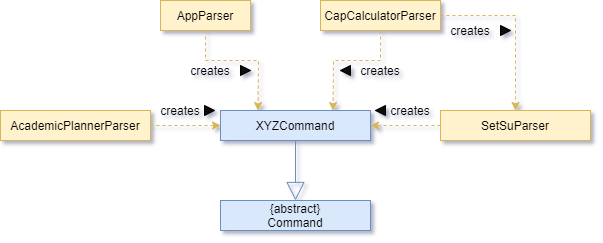
For the architecture of PlanNUS, the Parser classes will belong under the application they will be parsing for. The role
of these parsers is to process the user’s input and return the appropriate command with required parameters to initialise the command. The newly created objects will then be returned to the main command to be executed and thereafter, terminated.
API : src.main.java.seedu.duke.parser.AppParser, src.main.java.seedu.duke.apps.academicplanner.AcademicPlannerParser, src.main.java.seedu.duke.apps.capcalculator.CapCalculatorParser and src.main.java.seedu.duke.apps.capcalculator.SetSuParser
3.5.4. Ui Component
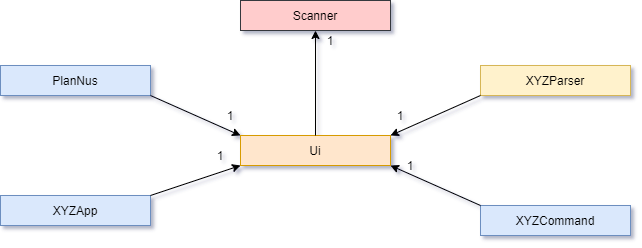
Note: XYZ stand for any class. For example, XYZParser refers to AppParser,AcademicPlannerParser etc.
In PlanNUS, the Ui component is integral in initialising a Scanner class and passing it to methods where they require them. Ui also provides functions to output formatted lines to console to improve readability for the user.
API : src.main.java.seedu.duke.ui.Ui
4. Implementation
4.1. Academic Calendar Planner: Add Module feature
4.1.1. Current implementation
Add module command is executed by AcademicPlannerParser. It allows users to add modules into their Academic Planner by instantiating a new PartialModule object and adding it into the userModuleList and userModuleMap. Both the list and hashmap are the java API, which are used by importing them. The Person object is used to encapsulate both userModuleList and userModuleMap.
Additionally, the add module command extends the Command class and overrides its execute() command. An external class, ModuleValidator is called upon to validate the various parameters that the user has entered, as to only allow valid modules to be added to the user.
Given below is an example usage scenario and how add module command behaves at each step.
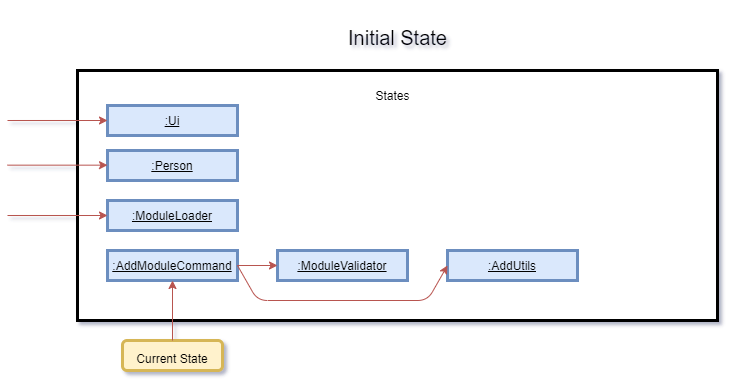
Step 1 : The user calls the add module command from the AcademicPlannerParser, which will initialise a
AddModuleCommand. AddModuleCommand’s constructor takes in parameters of ModuleLoader, Person,Ui,
and String. Below is a table of what each parameter corresponds to in the state diagram of the program.
| Parameter (Class Name) |
Corresponds to (Function of Class) |
Referred to as (Variable Name) |
|---|---|---|
ModuleLoader |
Class representing all modules offered by NUS | allModules |
Person |
Class representing current user’s information | currentPerson |
Ui |
Class encapsulating java’s default scanner class | in |
String |
Class representing the module code to be added | moduleCode |
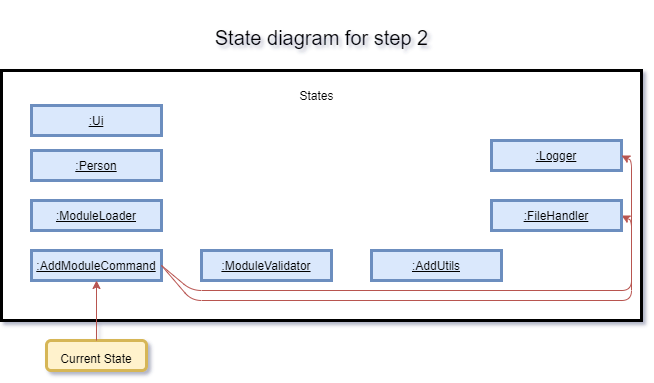
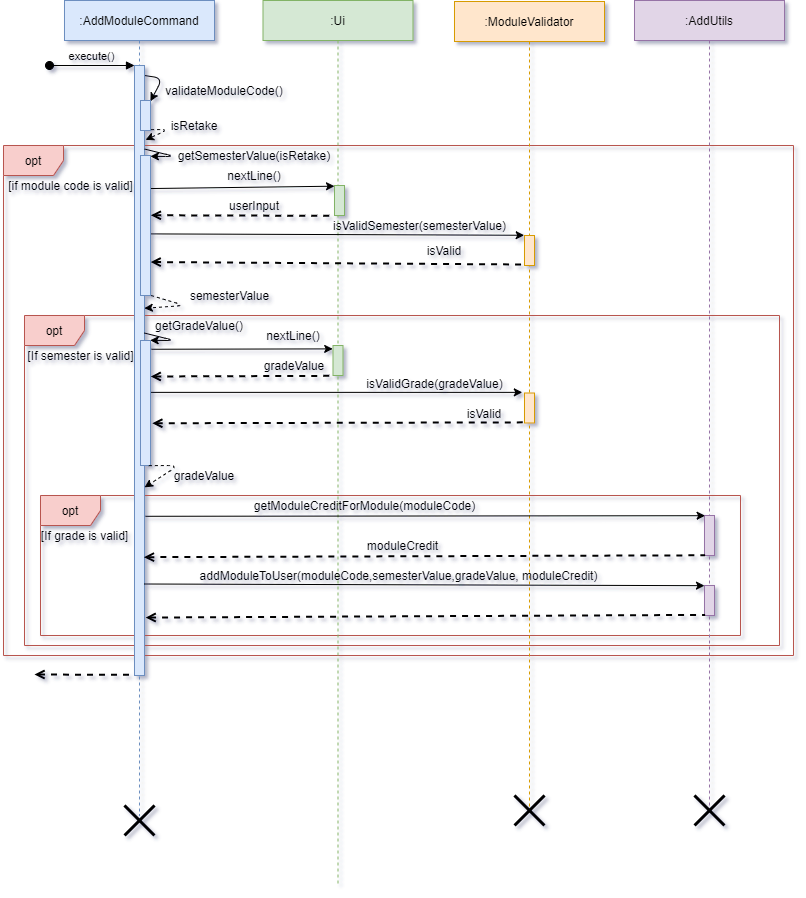
Step 2 : execute() is called from the instance of AddModuleCommand. It can throw AcademicException
or IOException. FileHandler and Logger classes from the java API are instantiated to handle logging for the remainder of the execute() method.
Step 3 : in then reads in the next line of input, which is the user’s input for the desired semester for the moduleCode. This is then validated against allModules, while accounting for isRetake variable. isRetake is a flag variable which indicates that
the module newly entered by the user is a module that is going to be retaken.
Step 4 : The next line of input is read from in, which is the user’s input for grade value, which is also validated by ModuleValidator.
Step 5 : AddUtils is called upon to return module credit for moduleCode by getModuleCreditForModule().
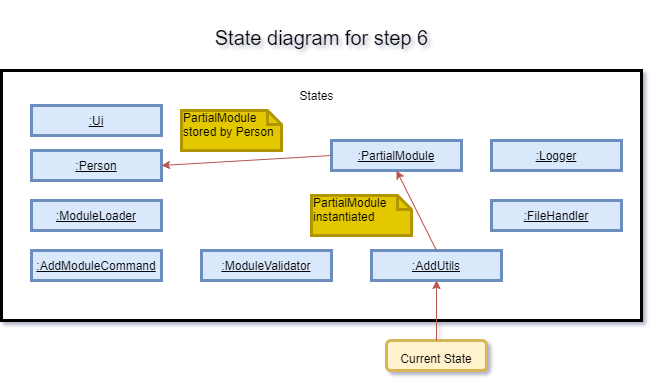
Step 6 : AddUtils is called upon again to add the module’s data to the user, by instantiating a new
PartialModule and storing it in both userModuleList and userModuleMap via Person.
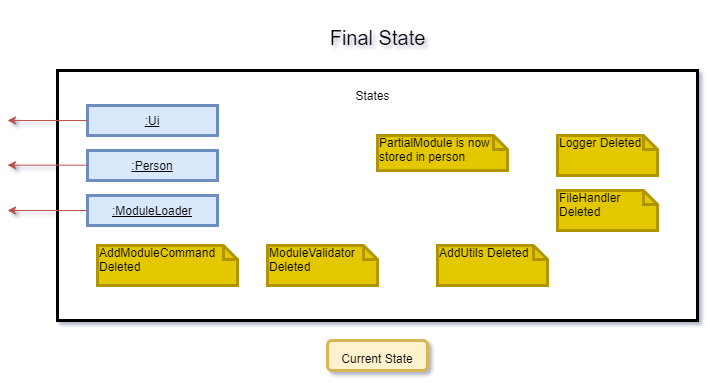
Step 7 : FileHandler, Logger, ModuleValidator, AddUtils and AddModuleCommand are terminated. PartialModule is not terminated as it is now referenced by userModuleList and userModuleMap in Person.
The following sequence diagram shows how the AddModuleCommand works:
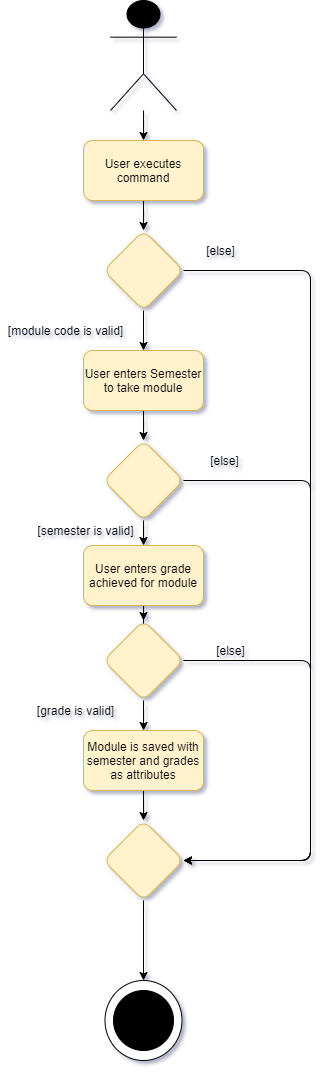
The following activity diagram summarizes what happens when the user executes a AddModuleCommand :
4.1.2. Design considerations
The following options were considered when implementing commands:
- Option 1 (Current Implementation): Implementing each command as a class by itself
- Pros: Increases modularity of code, higher overall code quality
- Cons: More complicated to implement
- Option 2: Implementing each command as a method in a class
- Pros: Easier to implement
- Cons: Class needs to be instantiated and increases coupling, reducing testability. This method also decreases SLAP.
4.2. Academic Calendar Planner: Edit Module Feature
4.2.1. Current implementation
Similar to the add module command, the edit module command is also executed by AcademicPlannerParser. It allows the user to edit the existing modules added to their Academic Planner by accessing the specified PartialModule object within the userModuleListand userModuleMap.
Given below is an example usage scenario and how edit module command behaves at each step.
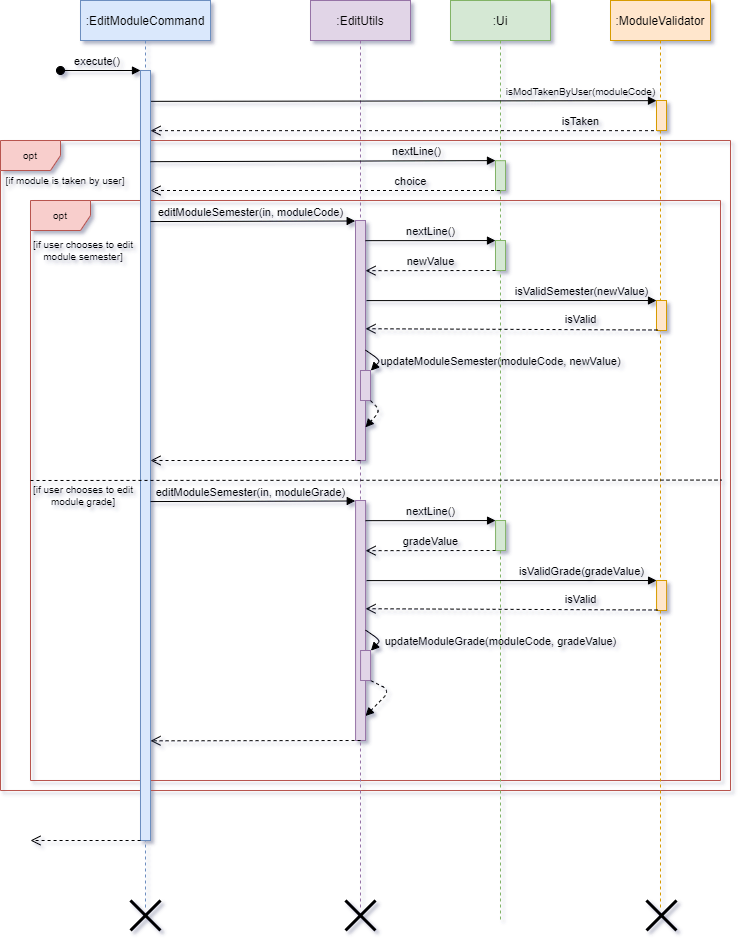
Step 1: The user calls the edit module command from the AcademicPlannerParser and then EditModuleCommand will be initialized where its constructor would take in the same parameters as that of AddModuleCommand.
Step 2: The execute() method is called from the instance of EditModuleCommand which only throws AcademicException if applicable.
Step 3: Method isModTakenByUser() of the ModuleValidator is called to check if the moduleCode entered by the user exists within the userModuleList and userModuleMap.
Step 4: If there are multiple occurrences of the specified moduleCode which are retaken, the user will be prompted to select the desired index of the module to be modified.
Step 5: in reads the next line of input for user’s choice of modifying either the semester or grade of the selected moduleCode.
Step 6: isValidSemester() or isValidGrade() is called to validate the semester or grade entered by the user.
Step 7: updateModuleSemester() or updateModuleGrade() is then called to conduct necessary changes to the information by accessing the module from userModuleMap and userModuleList.
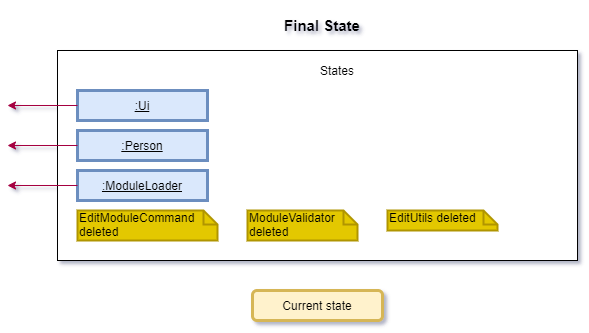
Step 8: EditModuleCommand, EditUtils and ModuleValidator are terminated.
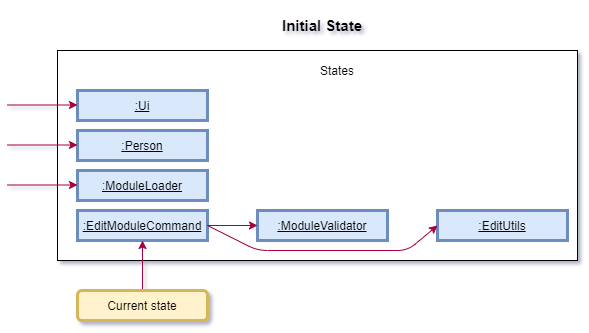
The following sequence diagram shows how EditModuleCommand works.
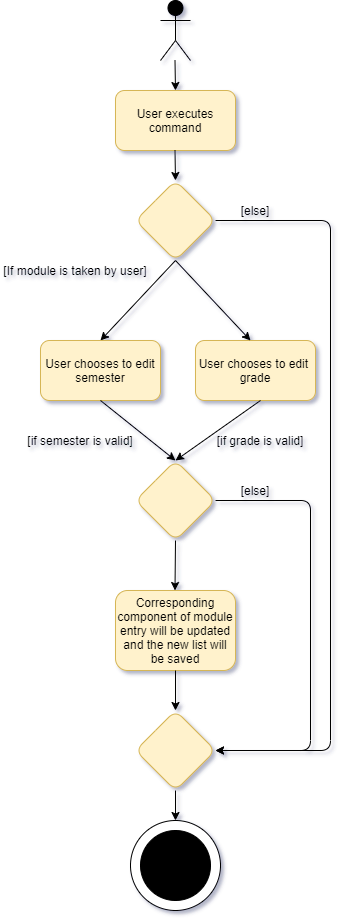
The following diagram summarizes what happens when the user executes a EditModuleCommand:
4.3. Academic Calendar Planner: Remove Module Feature
4.3.1. Current implementation
The remove module command is executed by AcademicPlannerParser just like the commands for add and edit. This feature allows the user to delete any existing modules added to their Academic Planner. by first accessing the specified PartialModule object within the userModuleListand userModuleMap.
Given below is an example usage scenario and how remove module command behaves at each step.
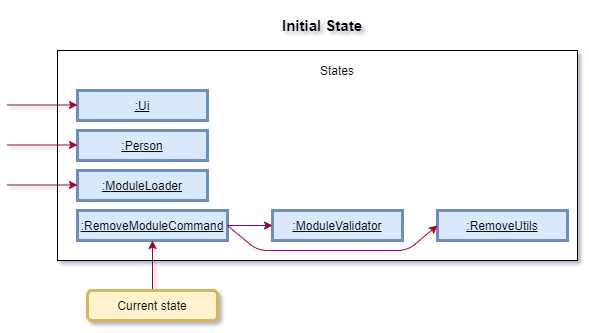
Step 1: The user calls the remove module command from the AcademicPlannerParser and then RemoveModuleCommand will be initialized where its constructor would take in the same parameters as that of AddModuleCommand and EditModuleCommand.
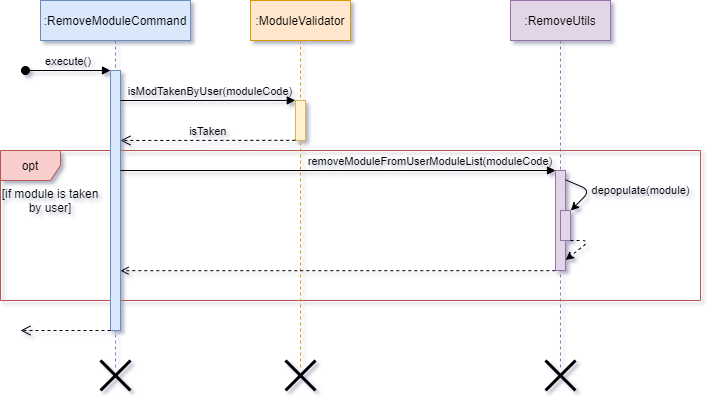
Step 2: The execute() method is called from the instance of RemoveModuleCommand which only throws AcademicException if applicable.
Step 3: Method isModTakenByUser() of the ModuleValidator is called to check if the moduleCode entered by the user exists within the userModuleList and userModuleMap.
Step 4: removeModuleFromUserModuleList() of removeUtils is then called to delete the specified moduleCode.
Step 5: Thedepopulate() method deletes the module object by accessing it from userModuleMap and userModuleList before updating the both the hashmap and the array list.
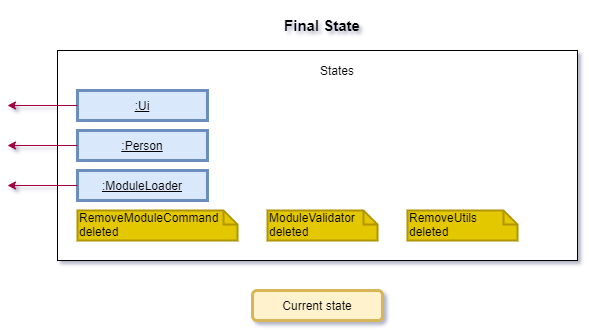
Step 6: RemoveModuleCommand, RemoveUtils and ModuleValidator are terminated.
The following sequence diagram shows how RemoveModuleCommand works.
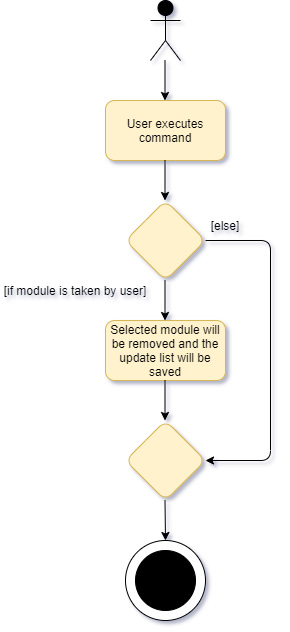
The following diagram summarizes what happens when the user executes a RemoveModuleCommand:
4.4. Academic Calendar Planner: View Module Details Feature
4.4.1. Current implementation
View module details command is executed by AcademicPlannerParser. It allows the user to view the full details of any module offered by NUS, by accessing the specified FullModule object that corresponds to the module code entered by the user, and printing its attributes.
Additionally, the view module details command extends the Command class and overrides its execute() command. An external class, ModuleValidator is called upon to validate the module code that the user has entered, as only the details of valid NUS modules can be displayed.
Given below is an example usage scenario and how view module command behaves at each step.
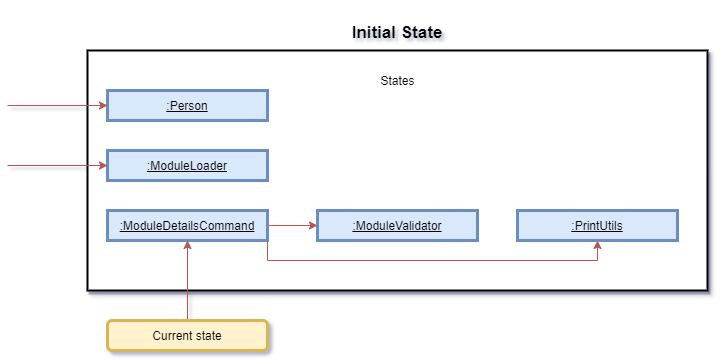
Step 1: The user calls the view module details command from the AcademicPlannerParser, which will initialise a ModuleDetailsCommand. ModuleDetailsCommand’s constructor takes in parameters of ModuleLoader and String. Below is a table of what each parameter corresponds to in the state diagram of the program.
| Parameter (Class Name) |
Corresponds to (Function of Class) |
Referred to as (Variable Name) |
|---|---|---|
ModuleLoader |
Class representing all modules offered by NUS | allModules |
String |
Class representing the module code to print details of | moduleCode |
Step 2: execute() is called from the instance of ModuleDetailsCommand. It can throw AcademicException.
Step 3: validateModuleCode() is called to validate the user input, moduleCode, against allModules.
Step 4: PrintUtils is called to print the details of the module.
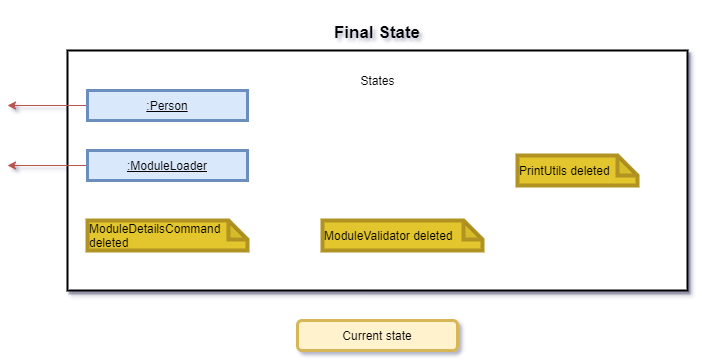
Step 5: ModuleDetailsCommand, ModuleLoader and PrintUtils are terminated.
The following sequence diagram shows how ModuleDetailsCommand works.

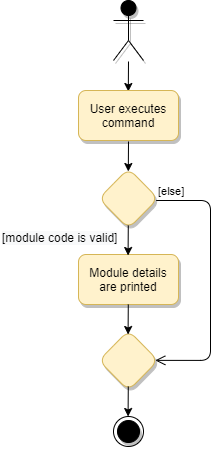
The following diagram summarizes what happens when the user executes a ModuleDetailsCommand:
4.5. CAP Calculator feature : Show current results feature
4.5.1. Current implementation
CurrentCommand is executed by CapCalculatorApp. It displays user’s current CAP, graded MCs and total MCs. These parameters depend on the modules added in AcademicPlannerApp and is retrieved from the Person object. These data are obtained by calling the methods getCurrentTotalMcxGrade(), getCurrentMcAfterSU() and getCurrentMc().
Given below is an example usage scenario and how edit module command behaves at each step.
Step 1: The user calls the CurrentCommand from the CapCalculatorParser and the parameter currentPerson will be parsed into CurrentCommand and a new instance of CurrentCommand is created.
Step 2: The execute() method is called from the instance of CurrentCommand.
Step 3: The getCurrentCap() method is then called to get the current CAP of user.
Step 4: The methods displayCurrentCap(), displayCurrentMcAfterSU() and displayCurrentMc() is then called to display the corresponding results to user.
Step 5: CurrentCommmand is then terminated.
The following sequence diagram shows how CurrentCommand works.

4.6. CAP Calculator feature : Set S/U by semester feature
4.6.1. Current implementation
SetSuBySemesterCommand is executed by CapCalculatorApp. It provides users with a suggestion on how they can S/U their modules added in AcademicPlannerApp by retrieving the userModuleList from the Person object and filter the list according to the semester provided to get a suList.
suList will then be analysed to provide user with a list of suggested S/U modules to achieve the best CAP.
Given below is an example usage scenario and how SetSuBySemesterCommand behaves at each step.

Step 1: The user calls the set S/U command from the CapCalculatorParser and the parameters choice, currentPerson and ui will be parsed into SetSuParser.
Step 2: Depending on the parameter choice, SetSuParser decides either SetSuBySemesterCommand or SetSuByModulesCommand to be parsed into CapCalculatorApp. Taking that the user decides to parse the SetSuBySemesterCommand by entering 1.
Step 3: The execute() method is called from the instance of SetSuBySemesterCommand which only throws CapCalculatorException if applicable.
Step 4: SetSuUtils is created and the method promptUserForSemester() of SetSuUtils is called to read the next line of input for user’s choice of a semester to S/U.
Step 5: The method getSuListBySemester() of SetSuUtils is then called to get a list of valid modules that the user can S/U.

Step 6: The method showResultsToUser() of SetSuUtils is then called to display the suggestions to user.
Step 7: SetSuBySemesterCommmand and SetSuUltils are terminated.

The following sequence diagram shows how SetSuBySemesterCommand works.

The following diagram summarizes what happens when the user executes a SetSuBySemesterCommand:

5. Useful Links
- About Us
- Configuration guide
- DevOps guide
- Documentation guide
- Logging guide
- Testing guide
- User guide
6. Appendix: Requirements
6.1. Product scope
Target user profile:
- has adequate level of familiarization with CLI applications
- requires a clear outlook of academic journey with the modules offered by NUS
- wants to keep track of his or her results and set target grades for the upcoming semester(s)
- prefers using desktop or laptop instead of other electronic devices
Value proposition: Provides NUS undergraduates with a platform to keep track of their academic progress and explore other possibilities with the plethora of modules available. In addition, provides NUS undergraduates with an avenue to have an automatic calculation of their scores and receive information regarding the use of their Satisfactory / Unsatisfactory options.
6.2. User stories
| Version | As a … | I want to … | So that I can … |
|---|---|---|---|
| v1.0 | fresh undergraduate | visualize the modules in the recommended schedule and course requirements | better plan out my academic journey for the next 4-5 years in NUS |
| v1.0 | undergraduate with at least 1 semester of study completed | calculate my CAP easily | forecast my own expected graduation CAP and if they match my expected CAP |
| v1.0 | undergraduate with at least 1 semester of study completed | print out a personalized list of modules taken so far and grades obtained | track my academic progression in NUS |
| v2.0 | user of PlanNUS | find modules I have completed in a particular semester | view specific information I require about that semester without redundant information |
| V2.0 | user of PlanNUS | easily access my last made list | save time on retyping my academic calendar after each use |
| V2.0 | user of PlanNUS | view module details | make an informed decision on which modules to take up during the semester |
| V2.0 | user of PlanNUS | search modules by their partial keys | view more modules with similar subject codes |
| V2.0 | undergraduate with at least 1 semester of study completed | have suggestions on which modules to mark as S/U | make an informed decision on which modules to S/U |
6.3. Use cases
Use case 1: Add a module to academic calendar
Preconditions: User is in the Academic Planner app.
MSS
-
User chooses to add a module to their academic calendar.
-
PlanNUS prompts user to enter semeseter that they plan to take the module.
-
User enters semester that they plan to take the module.
-
PlanNUS prompts user to enter grade received for the module.
-
User enters grade received for the module.
-
PlanNUS adds the module to the user’s academic calendar, and displays a confirmation message
Use case ends.
Extensions
-
1a. User did not specify a module code while adding a module.
- 1a1. PlanNUS shows a missing parameter error message.
Use case ends.
-
1b. User enters a module code that is not offered by NUS.
- 1b1. PlanNUS shows an invalid module code error message.
Use case ends.
-
3a. User enters an invalid semester.
-
3a1. PlanNUS shows an invalid semester error message.
Use case ends.
-
-
5a. User enters an invalid grade.
-
5a1. PlanNUS shows an invalid grade error message.
Use case ends.
-
Use case 2: Edit a module in academic calendar
Preconditions: User is in the Academic Planner app.
MSS
-
User chooses to edit a module currently in their academic calendar.
-
PlanNUS prompts user to indicate the feature (semester/grade) that they would like to edit.
-
User chooses feature to edit.
-
PlanNUS prompts user to enter updated value for chosen feature.
-
User enters updated value.
-
PlanNUS edits the value accordingly, stores the updated value in the user’s academic calendar, and displays a confirmation message.
Use case ends.
Extensions
-
1a. User did not specify a module code while editing a module.
- 1a1. PlanNUS shows a missing parameter error message.
Use case ends.
-
1b. User enters a module code that is not offered by NUS.
-
1b1. PlanNUS shows an invalid module code error message.
Use case ends.
-
-
1c. User enters a module code that is offered by NUS, but is not currently in the user’s academic calendar.
-
1c1. PlanNUS shows a module not in calendar error message.
Use case ends.
-
-
3a. User chooses a feature that is invalid.
-
3a1. PlanNUS shows an invalid feature error message.
Use case ends.
-
-
5a. User enters an updated value that is invalid.
-
5a1. PlanNUS shows an invalid value error message.
Use case ends.
-
Use case 3: Remove a module from academic calendar
Preconditions: User is in the Academic Planner app.
MSS
-
User chooses to remove a module currently in his or her academic calendar.
-
PlanNUS removes the corresponding module from the user’s academic calendar, and displays a confirmation message.
Use case ends.
Extensions
- 1a. User did not specify a module code while removing a module.
- 1a1. PlanNUS shows a missing parameter error message.
Use case ends.
-
1b. User enters a module code that is not offered by NUS.
-
1b1. PlanNUS shows an invalid module code error message.
Use case ends.
-
-
1c. User enters a module code that is offered by NUS, but is not currently in the user’s academic calendar.
-
1c1. PlanNUS shows a module not in calendar error message.
Use case ends.
-
Use case 4: View details of a module
Preconditions: User is in the Academic Planner app.
MSS
-
User chooses to view details of a module.
-
PlanNUS prints the details of the corresponding module.
Use case ends.
Extensions
- 1a. User did not specify a module code while viewing details of a module.
-
1a1. PlanNUS shows a missing parameter error message.
Use case ends.
-
- 1b. User enters a module code that is not offered by NUS.
-
1b1. PlanNUS shows an invalid module code error message.
Use case ends.
-
Use case 5: Search for a module
Preconditions: User is in the Academic Planner app.
MSS
-
User searches for a module, based on the module code.
-
PlanNUS displays the search results, up to and including the first 10 results.
Use case ends.
Extensions
- 1a. User did not specify a module code while searching for a module.
-
1a1. PlanNUS shows a missing parameter error message.
Use case ends.
-
Use case 6: View academic calendar
Preconditions: User is in the Academic Planner app.
MSS
-
User chooses to view his or her current academic calendar.
-
PlanNUS prompts user to indicate his or her desired viewing timeframe, i.e.
a) the full academic calendar, or
b) view a particular semester only.
-
User specifies their desired timeframe.
-
PlanNUS displays the academic calendar accordingly.
Use case ends.
Extensions
-
1a. User’s academic calendar is currently empty.
-
1a1. PlanNUS shows an empty calendar error message.
Use case ends.
-
-
3a. User did not specify a valid timeframe.
-
3a1. PlanNUS shows an invalid timeframe error message.
Use case ends.
-
-
3b. User specifies a valid semester, but there are no modules added to that semester yet.
-
3b1. PlanNUS shows an empty semester error message.
Use case ends.
-
Use case 7: View list of available commands
Preconditions: User is in the Academic Planner app or CAP Calculator app.
MSS
-
User chooses to view the list of available commands in the Academic Planner app.
-
PlanNUS displays the list of available commands.
Use case 8: Exit back to PlanNUS
Preconditions: User is in the Academic Planner app or CAP Calculator app.
MSS
-
User chooses to exit from the Academic Planner app back to the PlanNUS main menu.
-
PlanNUS exits back to the PlanNUS main menu.
Use case 9: View current results in CAP Calculator
Preconditions: User is in the CAP Calculator app.
MSS
-
User chooses to view his or her current results.
-
PlanNUS displays user’s current results.
Use case ends.
Use case 10: Set target CAP in CAP Calculator
Preconditions: User is in the CAP Calculator app.
MSS
-
User chooses to set a target in CAP Calculator.
-
PlanNUS prompts user for a target CAP.
-
User enters a target CAP.
-
PlanNus prompts user for number of graded MCs to achieve that target CAP.
-
User enters a target graded MCs.
-
PlanNus displays user with the results needed to achieve the target CAP.
Use case ends.
Extensions
- 3a. User did not enter a valid target CAP.
-
3a1. PlanNUS shows an invalid CAP error message.
Use case ends.
-
- 5a. User provides a valid target CAP, but the target MCs is not valid.
-
5a1. PlanNUS shows an invalid MCs error message.
Use case ends.
-
Use case 11a: Set S/U by semester in CAP Calculator
Preconditions: User is in the CAP Calculator app.
MSS
-
User chooses to set S/U in CAP Calculator.
-
PlanNUS prompts user for his or her desired set S/U method.
a) Set S/U by semester, or
b) Set S/U by modules
-
User enters to set S/U by semester.
-
PlanNus prompts user for the semester that he or she wishes to S/U.
-
PlanNus displays user with the the best CAP possible and the modules.
Use case ends.
Extensions
-
3a. User did not enter a valid semester.
-
3a1. PlanNUS shows an invalid semester error message.
Use case ends.
-
Use case 11b: Set S/U by modules in CAP Calculator
Preconditions: User is in the CAP Calculator app.
MSS
-
User chooses to set S/U in CAP Calculator.
-
PlanNUS prompts user for his or her desired set S/U method.
a) Set S/U by semester, or
b) Set S/U by modules
-
User enters to set S/U by modules.
-
PlanNus prompts user for number of modules that he or she wishes to S/U.
-
PlanNus prompts user for the module codes that he or she wishes to S/U.
-
User enters to the module codes.
-
PlanNus displays user with the the best CAP possible and the modules.
Use case ends.
Extensions
-
3a. User did not enter an integer.
- 3a1. PlanNUS shows an invalid number error message.
-
3b. User enters a number that is too large.
-
3b1. PlanNUS shows a number out of bound error message.
Use case ends.
-
-
5a. User did not enter a valid module code.
- 5a1. PlanNUS shows an invalid module error message.
-
5b. User enters a duplicated module code.
-
5b1. PlanNUS shows a duplicate module error message.
Use case ends.
-
6.4. Non-Functional Requirements
- General
- Should work on any mainstream OS as long as it has Java
11or above installed. - Commands entered should be short and intuitive to reduce mistyping of commands
- Program should be compatible on a wide range of devices
- Should work on any mainstream OS as long as it has Java
- Academic Planner
- Viewing of Academic Calendar should be intuitive as a complicated or messy output compromises usability of PlanNUS
- Only verified modules offered by NUS should be able to be added to prevent confusion
- The navigation between applications should be intuitive
- CAP Calculator
- Data should be shared between applications in order to reduce redundant typing from the user
6.5. Glossary
Mainstream OS
Windows, Linux, Unix, OS-X
Life cycle
The duration in which the object is running and alive.
Sequence Diagram
A UML diagram that captures the interactions between multiple objects for a given scenario.
7. Features Coming Soon (V3.0 and beyond)
- Support max limit for the
Set SUfunction incapcalc - Support discontinued modules from NUS
- Support shortened commands for parsers
- Support validation of requirements for modules
8. Appendix: Instructions for manual testing
Given below are instructions to test the app manually.
ℹ️ Note: These instructions only provide a starting point for testers to work on; testers are expected to do more exploratory testing.
Launch and shutdown
-
Initial launch
-
Download the jar file and copy it into an empty folder.
-
Open a command prompt and navigate to the folder.
-
Enter
java -jar PlanNus.jarand press enter to launch the app.Expected: The PlanNUS main menu is displayed, and the save file is loaded. If a save file does not exist, a new one is created.
-
-
Shutdown
-
Test case:
exitExpected: PlanNUS saves data from the current session, prints a goodbye message, and exits the software entirely.
-
Entering and exiting apps
-
Entering apps from the main menu
-
Test case - entering the Academic Planner app.
Input:
acadplanoraExpected: PlanNUS enters the Academic Planner app.
-
Test case - entering the CAP Calculator app.
Input:
capcalcorcExpected: PlanNUS enters the CAP Calculator app.
-
-
Switching between apps
-
Test case - switching to the CAP Calculator app while in the Academic Planner app.
Input:
capcalcExpected: PlanNUS enters the CAP Calculator app.
-
Test case - Switching to the Academic Planner app while in the CAP Calculator app.
Input:
acadplanExpected: PlanNUS enters the Academic Planner app.
-
-
Exiting to the main menu from within an app.
-
Test case - exiting to the main menu.
Input:
exitExpected: PlanNUS exits to the main menu.
-
Adding a module to the academic calendar
-
Prerequisites: User is currently in the Academic Planner app.
-
Test case - all inputs are valid.
Input:
add cs2113tExpected: PlanNUS prompts user to enter semester that they plan to take the module.
Input:
1Expected: PlanNUS prompts user to enter grade received for the module.
Input:
NTExpected: PlanNUS adds the module, with the associated semester and grade information, to the user’s academic calendar. Prints a module added confirmation message.
-
Test case - invalid module code.
Input:
add cs1111Expected: PlanNUS shows a module not offered by NUS error message, and exits back to the Academic Planner app.
-
Other incorrect inputs to try: no module code, invalid semester indexes, invalid grades.
Expected: PlanNUS shows an error message, and exits back to the Academic Planner app. No module is added to the user’s academic calendar.
Editing a module currently in the academic calendar
-
Prerequisites: User is currently in the Academic Planner app, and the module being edited is currently in their academic calendar.
-
Test case - all inputs are valid. Feature being edited is semester.
Input:
edit cs2113tExpected: PlanNUS prompts user to enter number corresponding to feature to be edited.
(1 - semester, 2 - grade).
Input:
1Expected: PlanNUS prompts user to enter new semester value.
Input:
3Expected: PlanNUS edits semester accordingly, and prints a update successful confirmation message.
-
Test case - all inputs are valid. Feature being edited is grade.
Input:
edit cs2113tExpected: PlanNUS prompts user to enter number corresponding to feature to be edited.
(1 - semester, 2 - grade).
Input:
2Expected: PlanNUS prompts user to enter new grade.
Input:
A+Expected: PlanNUS edits grade accordingly, and prints a update successful confirmation message.
-
Other incorrect inputs to try: no module code, invalid module codes, valid module codes that are not in the user’s academic calendar, invalid features, invalid semester indexes, invalid grades.
Expected: PlanNUS shows an error message, and exits back to the Academic Planner app. No module features are edited.
Removing a module from the academic calendar
-
Prerequisites: User is currently in the Academic Planner app, and the module being removed is currently in their academic calendar.
-
Test case - all inputs are valid.
Input:
remove cs2113tExpected: PlanNUS removes module from user’s academic calendar, and prints a remove successful confirmation message.
-
Other incorrect inputs to try: no module code, invalid module codes, valid module codes that are not in the user’s academic calendar.
Expected: PlanNUS shows an error message, and exits back to the Academic Planner app. No module is removed from the user’s academic calendar.
Viewing the details of a module
-
Prerequisites: User is currently in the Academic Planner app.
-
Test case - all inputs are valid.
Input:
details cs2101Expected: PlanNUS prints the details of the corresponding module.
-
Other incorrect inputs to try: no module code, invalid module codes.
Expected: PlanNUS shows an error message, and exits back to the Academic Planner app. No module details are printed.
Searching for modules that contain a keyword
-
Prerequisites: User is currently in the Academic Planner app.
-
Test case - all inputs are valid.
Input:
search cs21Expected: PlanNUS prints the modules that contain the keyword, up to the first 10 results.
-
Other incorrect inputs to try: no search key.
Expected: PlanNUS shows an error message, and exits back to the Academic Planner app. No search results are printed.
Viewing the academic calendar
-
Prerequisites: User is currently in the Academic Planner app, and their academic calendar is currently not empty.
-
Test case - all inputs are valid.
Input:
viewExpected: PlanNUS prompts user to choose a viewing timeframe.
(
full- full academic calendar,1-10- specific semester)Input:
fullExpected: PlanNUS prints the user’s full academic calendar.
-
Other incorrect inputs to try:
viewwhen the academic calendar is empty, invalid viewing timeframe chosen.Expected: PlanNUS shows an error message, and exits back to the Academic Planner app. No academic planner is printed.
Viewing current CAP
-
Prerequisites: User is currently in the CAP Calculator app.
-
Test case - all inputs are valid.
Input:
currentExpected: PlanNUS prints the user’s current CAP, total graded MCs and total MCs taken.
Setting a target CAP
-
Prerequisites: User is currently in the CAP Calculator app.
-
Test case - all inputs are valid.
Input:
set targetExpected: PlanNUS prompts user to enter their target CAP.
Input:
4.3Expected: PlanNUS prompts user to enter the number of graded MCs they are taking to achieve the target cap.
Input:
50Expected: PlanNUS prints the minimum CAP required in order to achieve the target CAP.
-
Other incorrect inputs to try: target CAP not within
0.00-5.00inclusive, number of graded MCs not within1-180inclusive.Expected: PlanNUS shows an error message, and exits back to the CAP Calculator app. No CAP advice is printed.
Setting SU
-
Prerequisites: User is currently in the CAP Calculator app, and their academic calendar is currently not empty.
-
Test case - all inputs are valid. Set S/U by semester.
Input:
set suExpected: PlanNUS prompts user to enter number corresponding to S/U method
(1 - semester, 2 - modules)
Input:
1Expected: PlanNUS prompts user to enter semester that they wish to S/U.
Input:
1Expected: PlanNUS prints the current S/U list, possible S/U scenarios, and S/U advice.
-
Test case - all inputs are valid. Set S/U by modules.
Input:
set suExpected: PlanNUS prompts user to enter number corresponding to S/U method
(1 - semester, 2 - modules)
Input:
2Expected: PlanNUS prompts user to enter the number of modules that they wish to S/U.
Input:
2Expected: PlanNUS prompts user to enter the modules that they wish to S/U.
Input:
CS1231, thenCS1010Expected: PlanNUS prints the current S/U list, possible S/U scenarios, and S/U advice.
-
Other incorrect inputs to try: invalid S/U methods, invalid semester indexes, invalid number of modules (greater than the number of modules that have been taken), invalid module codes, valid module codes that are not in the user’s academic calendar.
Expected: PlanNUS shows an error message, and exits back to the CAP Calculator app. No S/U advice is printed.
Printing list of available commands
-
Prerequisites: User is currently in the Academic Planner or CAP Calculator app.
-
Test case - all inputs are valid.
Input:
helpExpected: PlanNUS prints a list of available commands in the app that the user is currently in.